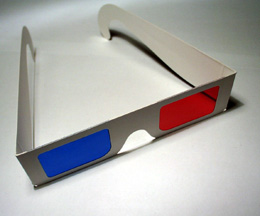
People working in 3D graphics always searched for ways to increase the feeling of real space. Some technologies are very expensive even today, but some are easily accessible. One of the cheap, but quite good technologies are the red-blue glasses.
The red-blue glasses are nothing more than pair of red and blue plastic clingfilms. You could get them on various places - they are typically advertisement objects, or attachments in some magazines about computer graphics.
You can create the "glasses" on your own, even with such cheap methods like painting the transparent clingfilms with some very mild colors.
It's declared to have red glass for left eye, and blue for the right one.
See the classic glasses on this image:

As you can see, the so called "glasses" are nothing hi-tech or complicated.
Now how it works. The image you are watching in red-blue mode is composed from two images - one for the left eye, one for the right one. The image for each eye is rendered with camera or view moved to special position, corresponding to each eye. So left eye gets other information than the right one.
The only disadvantage of this technique is the lost of color information - looking through red and blue filter you can hardly get 100% white and so on. But that's just little price for feeling of 3D :).
To perform such a tricks, we will use both TBGL and thinBASIC OpenGL header.
So let's start.
|
USES "TBGL" USES "UI" #INCLUDE "thinbasic_gl.inc" |
The first two lines you should recognize, if you have passed the beginners tutorials. They just bind two useful modules to our program.
The line with #INCLUDE says to thinBASIC to inject OpenGL function declarations.
|
Dim hWnd As Dword Dim EyeToggle As Long hWnd = tbgl_CreateWindow("TBGL using red-blue output - press ESC to quit") tbgl_ShowWindow GetAsyncKeyState(%VK_ESCAPE) |
Then we declare some useful variables. The hWnd will hold the TBGL window handle ( as usual ), EyeToggle is another beast.
It will later take just values 1 or -1, to specify the eye deviation from the center camera point.
|
WHILE IsWindow(hWnd) For EyeToggle = -1 To 1 Step 2 glLoadIdentity glClear (%GL_DEPTH_BUFFER_BIT) tbgl_Camera 0.025*EyeToggle, 0, 4, 0, 0, 0 IF EyeToggle = -1 then glColorMask (1,0,0,0) Else glColorMask (0,0,1,0) End If glColor3ub 255,255,255 glPushMatrix glBegin %GL_QUADS glVertex3f -15,-15,-15 glVertex3f 15,-15,-15 glVertex3f 15, 15,-15 glVertex3f -15, 15,-15 glEnd glPopMatrix ' ************************** ' * Main code of the scene * ' ************************** Next tbgl_DrawFrame If GetAsyncKeyState(%VK_ESCAPE) Then EXIT WHILE WEND tbgl_DestroyWindow |
Here comes the most important code. Maybe you are already scared by unknown statements, but don't panic.
The drawing of the image is performed in two passes. The main FOR/NEXT will setup the positions for each eye. For the left eye, which will take in this case negative X value, we will use red filter to whole scene, to right eye the blue one. That's achieved using OpenGL glColorMask function.
But how is it possible to overdraw the images for both eyes? We will not use tbgl_ClearFrame, but we will just delete depth data using glClear command. The glLoadIdentity functions does the same as TBGL_ResetMatrix.
I intentionally preffered the OpenGL statements over the TBGL ones in this tutorial, to help you in future with converting OpenGL code from other languages.
The most strange thing for you could be the mysterious quad polygon. It has very straightforward function - to gently prevent graphic artefacts of the "main graphic code". Because we are not clearing whole image, but just adding pixels to it, we need to use it.
See the image composition here:

When the all two channels of this stereo image are drawn, we can send it to screen using classic tbgl_DrawFrame. That's all.
As the implementation of red-blue algo is so easy, you can add it to your existing applications quickly - don't forget to add the helpful quad poly to prevent artefacts.
So, now comes the time to download the sample script! It presents very simple scene, you can disable ( = REM out ) the quad, to watch the artifact effect, if you want.